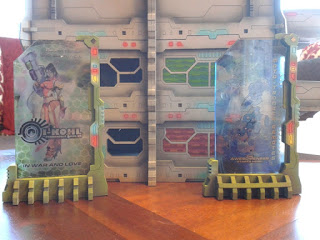
Over the Waterloo re-fight weekend, Scott ran a little Warmachine event at the Hutt club, the upshot of which was I walked away with $20 of Mighty Ape Vouchers (and some other people won some stuff... ;) ) Seriously, If you've not checked out the Hobby section at Mighty Ape then you're missing out in NZ! they have minis for most games as well as paints tools etc..
Anyway I blew my loot on the District 5 Apartment building and the Holo Signs sets from Micro Art Studios:
Most wargamers are familiar with laser cut HDF terrain by now so I'm just going to run through the builds of these with some hints and tips along the way that may or may not be useful :)
I'll crack on with the Holo Ads assembly.
First thing was to open the pack and check nothing had come out of the HDF sheet and gotten broken.
You can see the pretty clear and simple instructions and the clearly cut pieces as well as the really nicely printed ads - more on them later..
The instructions talk about cutting the pieces from the sheet as there are some small connectors still in place where the laser has only partially cut through the sheet. Flipping the sheet over shows these points up really clearly:
I did start trying to cut these out with a standard Xacto blade, you know, the really sharp pointy one that can dig REALLY deeply into your thumb when you slip :( After struggling for a little while with this I dug through my tool box looking for an easier way, and there was!
If you're going to do laser cut terrain, I seriously recommend trying to find a couple of blades like this! It's awesome, You can really get some force down on the joints without worrying about snapping the end of the blade or running your finger down the edge when you slip.... I picked it up as part of a pack of several different blade shapes so you may have to do some hunting..
Once all of the pieces were out and cleaned up (remove the fluffy bits where you've cut through the sheet joiners, it's on to assembly. TBH, I didn't see the point of a step by step on this, the instructions are very clear and you have to really try to get it wrong! (Famous last words).
I went through the same process with the District 5 Apartment Building, getting all of the parts out of the sheets first and sorting them out into piles of the same piece. Who said Wargaming is an OCD hobby!?!?
Again, the assembly instructions are pretty clear and simple to follow. One great thing I've found is the almost complete lack of gluing needed to keep these things together. The part fits are very tight so some care is needed to make sure that pressure is applied evenly to the pieces being fitted. The HDF can break pretty easily and delaminate which is a pig to sort out.
Painting: this I decided to approach as simply as possible - I didn't want to try to get detailed blends I really wanted to get them onto the table in a good, playable condition. The building and the holo ads were approached slightly differently, partly to see how they would work out and partly because I ran out of primer after priming the apartment building!
Buildings
OK, so I kicked off with a reasonably even coat of Tamiya grey primer. This gave a good 'concrete' look and was a light enough base to get at with the air brush (see, quick to table!). After that, I went around all of the raised panels and in each recessed joint with Vallejo Air Panzer grey. this was diluted 3:2 with Tamiya thinners to get a lighter coat that looks more like grime or shadow.
I picked a few of the details that might look like lights and airbrushed them white then over with Vallejo air Italian red to give it a bit of a glow effect. Similarly, a few panels and the door handles were airbrushed white then P3 Arcane Blue.
Another great tip - if you want some of the window shutters removed, do it before you assemble the building! trying to cut them out after you've assembled the building is a bit tricky!!
I brush painted the remaining window shutters to highlight the detail lasered in. A lot of the detail is really sharp, shallow lines which show through the paint really well. I also had a set of Micro Arts studios graffiti transfers, one of which you can see on the end of the building. They take a little cutting to get in position but they really add character.
I've put one on the door to this garage unit I've had kicking around for a while :)
Holo ads:
As I mentions, I ran out of grey primer before I sprayed these so a different tack was needed. The surface of the HDF is very smooth and this makes it difficult for some primers to adhere. GW Skull white was one of these! luckily, i had a can of Dulux Matt Black enamel lying around. This went on first to cover the HDF, then I followed up with the skull white on top. This gave a little pre-shading for the airbrush to colour over.
I then followed up with a coat for Vallejo air Light Camo green and shaded with German Green. "Lights panels" were picked out with the airbrush as before.
All in all I'm really pleased with how these have turned out, with a total of two short evenings for assembly and 2 afternoons with the airbrush for painting they're on the table pretty quickly and looking in keeping with the hard sci-fi theme for Infinity.
Now I'm really looking forward to the Infinity games at the Hutt club this Saturday! :)
Chris


