...I LOVE EARLY WAR!
As our club ran it's fifth Remember December event in honour of our departed friend Nick, it was back around to Early War Flames of War for some "I can't roll a firepower check for love nor money" hilarity that is 2cm guns.
Game 1: Regan, Grenadiers, Fighting Withdrawal
Regan bought an army retrofitted to Early War and against an army like mine that can be a rough handling. He'd bought a goodly number of 2cm guns and an 88 but some PaK 36s would have rounded out the list and taxed me almost as much as those HMGs did...


At the top of this photo, you can see my victorious 8-rads, who had just successfully MGed Regan's one 88 whose ambush had popped a single Panzer II. What followed was two turns of 2cm cannons shooting each other for a sum total of not a great deal. It was all very silly.

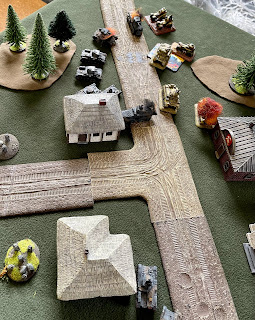
This is about turn 4 after Regan's Grenadier platoon had assaulted my 8-rads, killed one and the other ran away and prompltly failed his last man standing test.

This last image is shortly before the end of the game. In the top left are 4 SdKfz 10/4s that gave me more trouble than they should have. They just wouldn't die or run away. The Panzer IIIs presaged their performance in the next game by being utterly useless.
The tank platoon on the left assaulted the HMGs and just went ah, sod it and took the defensive fire from the 10/4. They saved a bunch of hits from the one 2cm AA gun that could have been a problem and bailed out to HMG fire instead. Moments later, the platoon on the left rolled in and finished the job.
It was a tough ask for Regan's army but he defended well and I think proved that HMGs in EW are genuinely a force to be reckoned with.
Game 2: Russell, Stuarts, Free for All
This was a game where I needed my Panzer IIIs to do some heavy lifting. They did not. Stuarts are a tough ask for Panzer IIs in EW, even if they're trained, as there's a lot of work to get on the flanks and try and get the best chance of knocking them out. I think I did a good job of that and this game was a real back and forth until the last turn where it really could have gone either way.


At this point, my Panzer IIIs had fled the field, much to my chagrin, but I still had some good flank shots on Stuarts. On this flank by this point, I was fighting a holding action. I just needed to hold out while my other Panzer platoon, 8-rads and the 2iC took the less well defended objective. If you can see Russell's dice in the background, that's 5 shots on 4s for one hit. Which bailed a Panzer II!

This was my last really good shot at the objective and, honestly, it came down to that Stuart sitting on the objective passing his Last Stand test. If he hadn't, I had three Panzer IIs to remove three Marmon Herringtons and Russell was a turn away from my objective.
As it was, he didn't fail the last stand, I failed to kill the last Stuart as well and this was where we wound up:

Game 3: Tony, Czech Panzer Company, Spearpoint
In game three, I played a Panzer 38(t) army in Spearpoint, one of the updated missions from the new FoW mission pack. Once we'd unpicked the delployment map and the goal of the mission, we got underway in the most restrained way possible.
The first couple of turns of this game were really non-events. I didn't pop my ambush and Tony waited until he had reserves before really having a crack at the front objective while also throwing a sneaky 38(t) platoon up one flank out of sight of my armour. Here's turn 3. Those infantry on the left are on Tony's deployment zone:

This photo is the state of play at turn 4 where my Panzer IIIs and some reserve Panzer IIs saw off the flanking force:

And then turn 6 where my reserve 8-rads and 2iC failed to see off either of the 38(t) HQ tanks OR any of Tony's Panzer IIs. On the top right you can see my Panzer IIIs who made a mad dash to an objective just out of frame at the top of the table.

Tony pulled the 38(t)s in the middle back to try and shoot me off the objective and his Panzer IIs and 38(t) HQ ruined my reserve Panzer IIs such that he had a pretty straight run at the objective. His shots on my Panzer IIIs bailed one, leaving us with a most absurd sequence of "remount required. If failed, last man required. If passed, I win. If failed, Tony wins" moments.
It was one of those games where the result doesn't really reflect the game either. If Tony had managed to shoot me off the objective then the game was his as I had a Panzer IIC and 2 Panzer Is holding the front objective and I think Tony's 38(t) HQ and 4 Panzer IIs would have rolled over those easily.
This game makes me want to give 38(t)s a try in EW. Whenever BF gets around to redoing EW for V4 properly, I will be in.
Next Time
The Hummels are done, pending adding foliage so they'll be in the gun for next week. I've got the final highlights on my Normans for my Byzantine army as well so will get those finished and maybe even based as a chance to try out my new basing ideas.
WTB pak36. It was a good game, panzer 2 is quite scary
ReplyDelete