A little while ago I picked up one of these wee beasties for my Warmachine Cryx army:
It's a mean piece of resin and lead and I really wanted to put something extra into the base to make it stand out. Luckily the 120mm diameter base is a reasonably sized canvas!
I'd seen examples on the web of the Kraken clambering over docks, wrecked ships etc which fitted some of the fluff but the big unveiling in the fiction is at the battle of Thornwood - not many ships or docks nearby...
This gave me the mental image of the Kraken pushing its way through trees, over steams. And the magpie was engaged!
I started off with a couple of pics taken on walks with the kids to get some idea of the effect I wanted to achieve. I originally intended to have the river bed dry as I han't played with water effects before and was finding it a little daunting! Half way through that changed and I took the plunge.
some river pics:
when I took these I was really looking at the rocks on the banks and in the water to try to get an idea of texture and what would look right.
next was onto the base:
I roughed out the general profile of what I wanted with trusty old cork tile then set about it with some Reeves Coarse texture gel. This is a medium gel used by canvas artists to add a gritty texture to their paint. I must admit I use it for all of my bases now - so much less hassle than sand and pva,It's about the consistency of toothpaste and you can smear it around with a sculpting tool. still takes about 24hrs to fully set but you have a sealed surface ready to take paint straight away.
I got a first coat of paint and a quick dry brush to get a feel for how the texture had taken the started adding some more details. the grey blobs are holes made by the feet of the Kraken. there are a couple of extra to give the impression that this hundred ton beast had been striding through the forest on stilettos - it's going to leave some dents! The river bed also got another coat of texture gel to use as an adhesive for the river rocks.
A few more rocks were added to break up some of the surface and add some interest.
This all got a good coat of burnt umber then dry brushed up with various shades of brown until I finally finished off with an ivory colour. the rocks actually came from the banks of a lake near where I used to live in the Waikato. they have a great, porous texture that really comes out when they're dry brushed. this is the point at which a bit of a block hit. Up until this point I had been working on a dry river bed but I didn't think it was going to work as it stood so the base went back on the shelf for a couple of weeks. No point forging on with something and not being happy with it!
after pondering and painting something else, I decided to go with the water effect. I posted a few noob questions on the Oz Painters facebook group and got some really useful tips. As I wanted to put a reasonable depth of water on the model I had to make sure I went for something with very low shrinkage and had little risk of yellowing. The concensus seemed to be a craft resin used by jewellery makers. As luck would have it, my local Spotlight had some of this:
After a test run in a miniature blister - always try things out somewhere it doesn't matter first - I held my breath and poured the stuff into the river... and waited...
This is where I learned to make sure that the edges you want to mask off need to be flat and smooth. I ended up using blu tac to seal in the strips of plastic to make sure that the resin didn't leak out over the table. It did the job but a tidy base edge would have been much better. I left the resin to set for 36 hours before attempting to peel off the masking tape and TA DA!!
The edge of the resin was still soft enough for me to be able to tidy up the miniscus with a sharp xacto knife. Another helpful hint is to only make the masking as tall as you want the water level to be - no pesky miniscus to trim!
Affter leaving if for another 24 hours to really set, I then lightly sanded the edges with some very fine wet/dry paper (add a small amount of soap to the grit to get a really smooth finish)
Going back to my reference pics, one thing that jumps out is that the water is not very smooth in real life. even a relatively still body of water will have some ripples and I wanted a babbling stream. Back the Oz Painters group and one thread later I was on Youtube watching this:making ripples . Great! now to get some Gloss Gel medium. this took some tracking down but I eventually found it in Whitcoulls of all places! I was working on a smaller surface than the guy in the vid so I made my own tools out of 3mm styrene:
The rounded tool is for the ripples and the sharp one turned out to be useful for manipulating the gel up to the edges of the river and around the rocks. the pieces of plastic are about 5-10mm wide.
just another 24 hours to wait.....
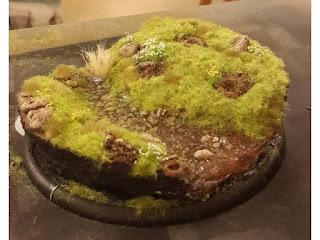
presto! babbling river! I was really pleased with how this turned out. It gives the base some life and movement, I just had to keep going with the flocking and make sure I didn't stuff it at the last hurdle
I picked up some Silfor Meadow flowers and had some GW grass tufts kicking around from a previous project. these would add some further texture to the base and break up the areas of flat grass. the slight difference in tone between the greens of the silfor, the GW tufts and the static grass all added to the natural effect IMO.
just waiting for the PVA under the static grass to dry - the longer the better in my experience...
Et Voila! I went back after this pic and added a bit more grass above the foot holes and generally tidied it up a bit..
Next step, when I'm feeling really brave, is to weather the wee beastie... may practice that on something else first...
Next update will be my nearly finished Impetus army! guess who got a couple of days at home with the kids ;o)
Pelarel


Oh Lordy! That looks so good Chris!
ReplyDeleteRipple effect and river stones on that looks great.
ReplyDeleteThat is awesome Chris... super impressed
ReplyDeleteAwesome water effects - overall a great little project!
ReplyDeleteAwesome water effects - overall a great little project!
ReplyDeleteThanks guys, I really want to try this out on a few other models now but it may have to be on terrain pieces
ReplyDeleteSome seriously stunning work Mr O. Can't wait to face it on the tabletop :)
ReplyDelete